Hi Crafters! I am so excited to be apart of the Linky Party for Build Your Stash Holiday Cardmakers!
This year there is a great list of sponsors with lots of fun prizes. Just link up to the blog. You can find it here. https://byshcardmakers.blogspot.com/
To start us off here is my holiday card.
For my card, I used the Pink and Main stamp set Holiday Mugs. I colored the coffee cup with alcohol markers. I used a stencil in the background from one of the Crafty Courtyard card kits from Pink and Main. I did a little light ink blending over the stencil. I added a glitter frame with the Cloudy Frame Dies and used another color of glitter paper for the Merry Christmas die cut sentiment. This card was quick and easy!
Make sure you make a Christmas card and link up to the blog to be entered to win!
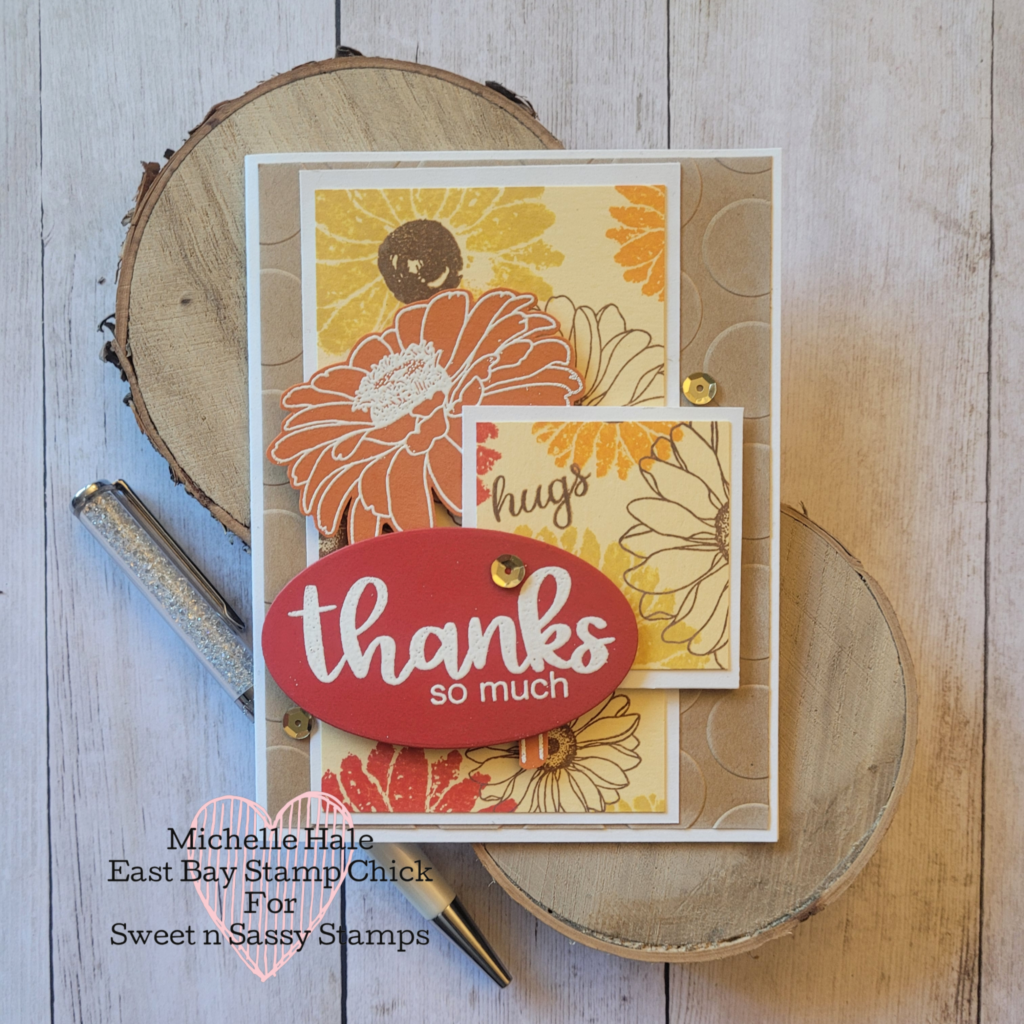
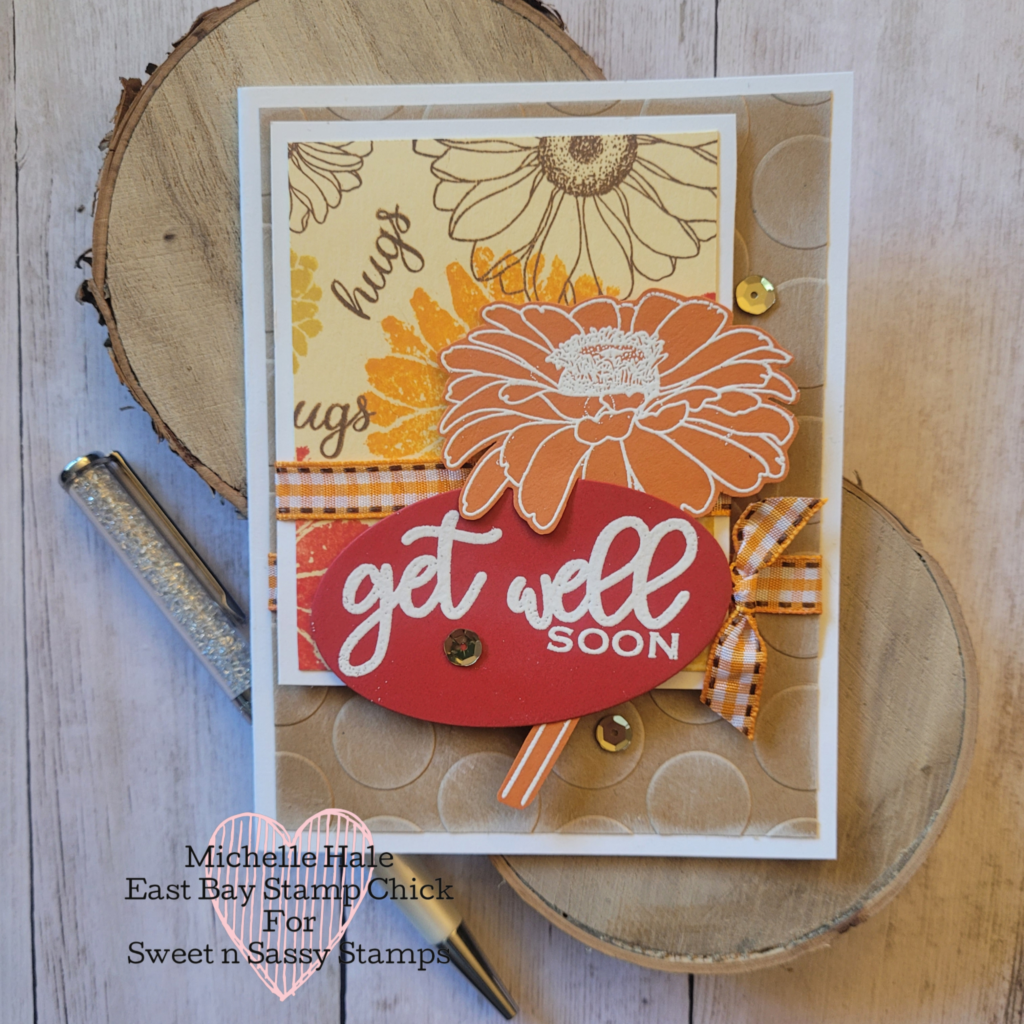
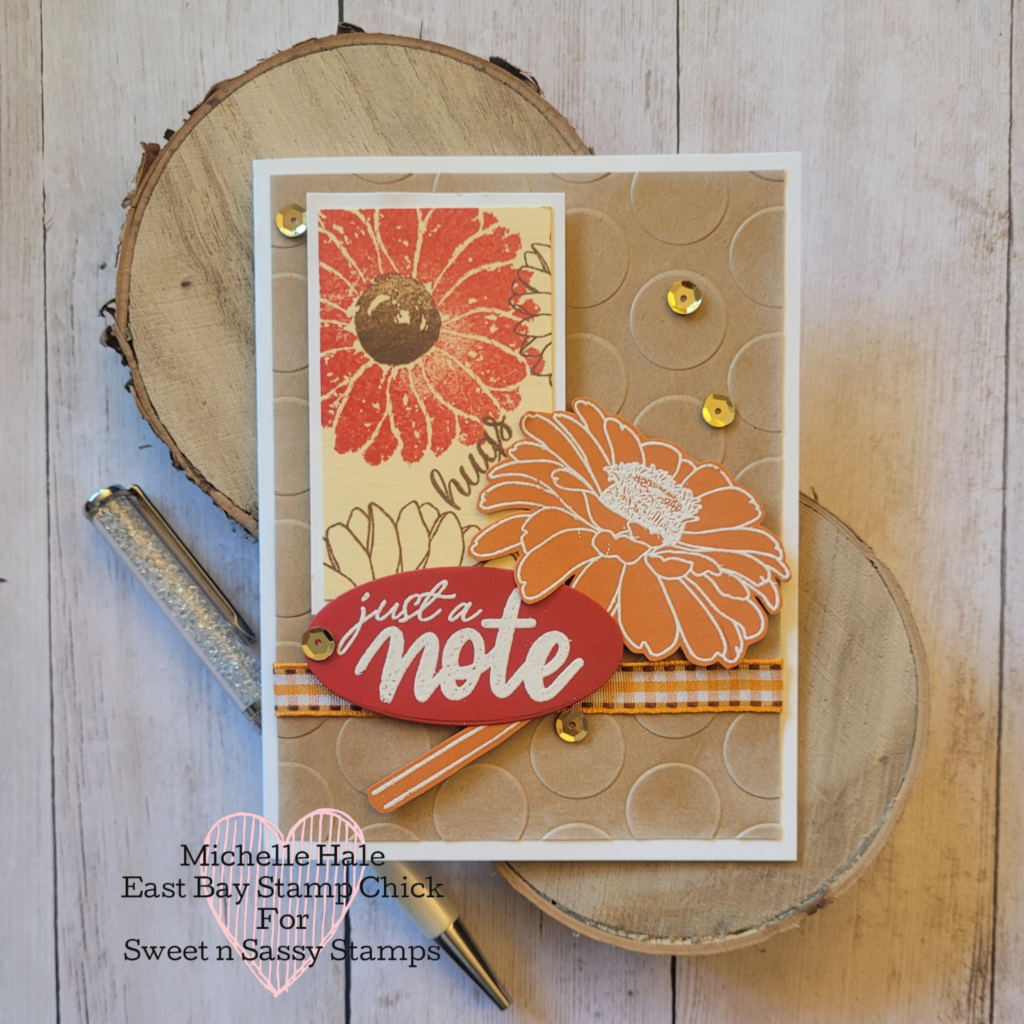
I recently took a sheet of 8.5×11 cardstock and stamped all over it to create my own patterned paper. Then I thought it would be fun to see how many cards I could make using my new patterned paper. Here’s the paper I made.
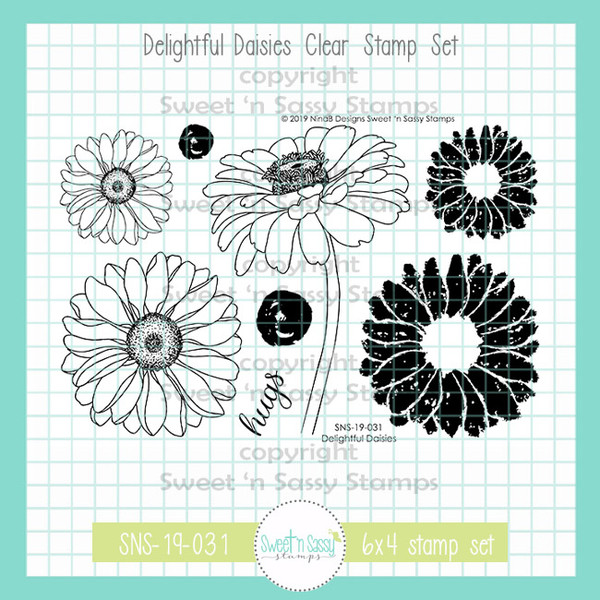
To make my patterned paper, I used Distress Oxide inks in Candied Apple, Carved Pumpkin, Fossilized Amber, and Gathered Twigs on a light butter yellow colored cardstock. I used the Delightful Daisies Stamp set from Sweet n Sassy Stamps.
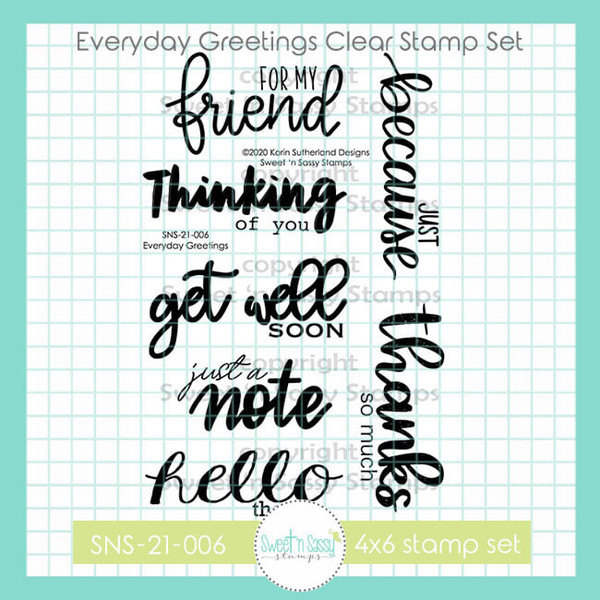
I used the Everyday Greetings from Sweet N Sassy Stamps for the sentiments.
Here are the cards I made.
To make the cards I cut the sheet of patterned paper up. I will show you what cuts I made below. I die cut 8 ovals for sentiments and I heat embossed the sentiments in white. I also cut 8 card panels out of kraft paper measuring 4×5.25 inches. I embossed all the kraft card panels with an embossing folder of large dots. I sponged a little white pigment ink on top of the embossed panels to bring out the definition. Once I cut up the patterned paper I cut a border panel for each piece of white cardstock. Each piece was a quarter of an inch bigger than the patterned piece. To help embellish the cards I heat embossed in white 8 of the daisies with the stem out of orange cardstock and fussy cut them out. Lastly I added ribbon and sequins.
Here is how I cut my patterned paper.
These cards were lots of fun to make! And now I have a set of 8 cards to give as a gift to someone!
If you give this a try please tag me on social media. You can find me on Instagram and Facebook as East Bay Stamp Chick. And if you enjoyed this blog post please leave me a comment and subscribe.
It’s that time of month again! Sweet ‘n Sassy Stamps has a new release! Here is my card to celebrate all the fun, new items!
Welcome to the Sweet ‘n Sassy April Release Hop. Hop along with us as we share our projects with the fabulous April release! Don’t forget to leave a little comment love for the designers linked below for a chance to be entered into our giveaway drawing for a $25 gift voucher to the Sweet ‘n Sassy Stamps shop. Winner will be announced on the SNSS blog, Wednesday, April 28.
To make this card, stamp the Butterfly Background stamp with Versamark ink. Then heat set with a white embossing powder. Once cooled, ink blend with Distress oxide ink in Blueprint Sketch, Salty ocean, and Tumbled Glass. Then i stamped the rainbow, sun and clouds. I colored the rainbow with alcohol markers. Die cut the images and adhere the images with foam squares. I finished by adding a few sequins for a little bling.
Here’s the list of designers for the blog hop. Check out each one and leave a comment to be entered to win!
Welcome to the Sweet ‘n Sassy Stamps December Release Hop. Hop along with us as we share our projects with the fabulous December release! Don’t forget to leave a little comment love for the designers linked below for a chance to be entered into our giveaway drawing for a $25 gift voucher to the Sweet ‘n Sassy Stamps shop. Winner will be announced on the SNSS blog, Wednesday, December 23.
Before I give you the list of where to hop let me show you the card I created for the hop!
Do you know anyone who needs a little encouragement? I think we all do. 2020 has been a different and a tough year for most. So I made a card that I can give to remind someone that God loves them more than they can imagine or know.
This card is pretty easy to make. The back ground XO paper is from a Valentine’s paper pad in my stash. I created the main panel by using the same Love stamp over and over. It’s from the Much Love Stamp set, which is also the stamp set of the month. It’s free with a $75 purchase for December
Once I added all the stamping in a pale pink, I stamped over the top in black my main sentiment, Love You More. I then added the dash with a black marker and added the God after it using the Marker Alpha set.
Lastly the heart came from the Forever and Always stamp set.
Ok, so now you’ve seen my latest card, here is the list of where to hop. Don’t for get to leave a comment on each blog to be eligible to win the $25 prize!
I’m super excited to be apart of the Sweet n Sassy November Release Blog Hop.
Welcome to the Sweet n Sassy Stamps November Release Hop! We’re celebrating 13 years of Sweet n Sassy Stamps this month! Hop along with us as we celebrate and share our projects with the fabulous November release with you! Don’t forget to leave a little comment love for the designers linked below for a chance to be entered into our giveaway drawing for a $25 gift voucher to the Sweet n Sassy Stamps shop. Winner will be announced on the SNSS blog, Wednesday, November 25th.
Before I give you the list of designers to hop to let me show you my latest card.
I used the new Make a Wish Stamp Set for those adorable cupcakes and the sentiment. I used the Texture Tiles 4 to create the plaid inside each cupcake’s frosting.
Here’s your chance to hop along with us and be entered to win! And don’t forget to leave a comment at each stop! Thank you for stopping by!
I love how digi stamps are instant gratification! No waiting for shipping or even leaving your house. Graciellie Designs has some beautiful images and recently I sat down and played with Ice Cream Bouquet.
I made 3 cards using the same image. The card in the front is a traditional A2 size, 4.25×5.5 inches. The 2 in the back are business envelop size, known as slim line cards.
For this card, I sized the image to fit an A2 size card. That’s one of the great things about digi stamps, is they can be any size you need! I colored the image with Spectrum Noir alcohol ink markers. I fussy cut the image out and then used foam squares to pop it up on the card panel. The card panel is actually a gel press print that I had in my stash. I added a sentiment from the Ice Cream Bouquet digi stamp set and used foam squares to pop it up.
Here are the slim line cards. I enlarged the image to almost fill an 8.5×11 inch piece of cardstock. I colored the image with Spectrum Noir alcohol ink markers and then cut it in half. It was a little scary to cut the paper in half after I spent all that time coloring! But it worked out ok. I mounted each on a piece of printed cardstock and then a black piece of cardstock and then mounted them to a card base. I did fussy cut the image and mounted them on foam squares. These cards will fit in a standard business envelop. The sentiments are from the Ice Cream Bouquet stamp set also.
Thank you so much for visiting my blog. Please subscribe so you can see all the inspiration in your mailbox!
I’m so excited, I am a guest designer for Sweet n Sassy Stamps for April 2020! I had the chance to play with 2 brand new stamp sets before their launch. So today I will show you one of the cards I made.
I think it came out so cute! I used the new Country Garden Stamp set, the existing Fur-ever Friends stamp set and the Tea for Two set, both illustrated by Jennifer Nilsson. Here are the sets.
To make the card I used water color paper and did a quick background using my Jane Davenport water color paints. I colored the all the images with Spectrum Noir Alcohol Ink Markers and popped them up on foam squares. I did fussy cut the cute bunny to layer behind the wheel barrow. I used printed paper from my stash and a scallop rectangle die from my stash. I added blue and pink sequins to finish.
Thank you for stopping by my blog. Don’t forget to subscribe so you can see lots of crafty inspiration.
Also if you want to check out Sweet n Sassy Stamps, click on the logo below. The link is an affiliate link that will provide a small commission to me.
I recently picked up the December 2019 issue of Simply Cards and Papercraft Magazine. It came with Altenew’s Modern Anemone stamp and die set. Here are the cards I made using the stamp and die set with a few extra items from my stash. All the cards are A2 size with the card panel measuring 4×5.25 inches and are popped up on a fun foam panel.
I think they came out so pretty! Here’s each card and the supplies I used.
Here is the set that came with the magazine.
It’s a simple stamp set with matching dies.
Let’s start with the blue flower card.
For this card I stamped 2 flowers using Altenew inks, Sapphire and Persian Blue. The leaves are stamped in Sweet Leaf and Just Green. I used the same colors plus Caribbean Sky for the stencil in the background. The stencil is from Altenew and is called Feeling Dotty. I did use a set of make up blending brushes, from Amazon, to apply the ink with the stencil. The sentiment is from the Modern Anemone set. I stamped the sentiment and frame in Jet Black ink from Altenew. The frame is from Altenew’s Sweet Friend stamp set. Lastly, I added a few Nuvo Drops in Morning Dew.
I stamped the 3 flowers in Blush and Jet Black both from Altenew. I used Blush and Pink Pearl on the stencil background. Same frame and leaves as in the other cards and added Nuvo Drops in Morning Dew.
The last card’s flowers are stamped in Crimson and Coral Bliss. The stencil background also has Rouge ink as well as Crimson and Coral Bliss. Same frame, leaves and Nuvo Drops.
I really loved how these cards turned out. This was also my 1st time using the Altenew inks and I really loved the colors!
Thank you so much for visiting. If you like seeing crafty ideas and inspiration then subscribe to my blog so you don’t miss out!
Twice a month The ArtsyStamper Shop from Etsy has a blog challenge. The winner receives a digi stamp from the Etsy store!
Here is my challenge inspiration.
I used paper and ribbon from my stash and the Rose Heart Layered Digital Stamp set from the Artsystamper Shop.
I just love that heart shaped rose, and because it’s a digital download, you can make it any size you want! I colored the rose with Spectrum Noir alcohol markers. Then I used a Quickie Glue Pen to trace the outline of the petals. I added glitter from my stash. The sentiment is from the digi stamp as well. Quick and easy!
Here is another card I made with the same digi stamp from last year.
And check out the ArtsyStamper challenge blog Here make sure you enter to win. Each challenge has a theme and if you don’t have Artsystamper digis, that’s ok! You can still enter and win.
Thank you for visiting! And don’t forget to hit the subscribe button and leave me a comment!
Recently I participated in a Faithdex card swap. These swaps are so fun because I sent in 10 cards and I will get back 10 cards from all across the United States. I’m excited to get the cards and see what everyone else has created! Here is the card I created for the swap.
I think the cards turned out super cute! To make the cards I use a Heidi Swapp memory dex die that I purchased from Amazon. I die cut out 2 cards, one from kraft cardstock for the back and one in printed paper. The paper I chose for the front has the subtle word script across it. I then inked the edges with a sponge and Hazelnut Ink from Fun Stampers Journey and glued the 2 sides together. I used stamps from Sweet n Sassy Stamps for the front. I stamped the front of the card with stamps from 4 different sets. The wood slice is from The Wood Backgrounds stamp set. The peonies are from the Peony Cluster stamp set. The peonies are embossed with Flashy Flamingo embossing powder from Glitters Galore (use to be called Sparkle n Sprinkle). This embossing powder has lots of sparkle because of all the glitter mixed with the powder. The sentiment is from the Genuine Love stamp stet and the heart from the Forever and Always stamp set. Lastly, I added some twine and a sequin to finish the card.
What makes this a Faithdex card instead of a Memory-dex card is the scripture on the back. Since everyone will be receiving their cards in February, I thought a love/ Valentines theme would be nice. So I picked a scripture that shows what true, genuine love is. That’s how God loves us. Human love can’t compare to how He loves us. I am constantly amazed at how He loves us. the God of the whole universe cares about all of us. That is a mind blowing thought!
If you want to check out any of the stamp sets I used, click on the Sweet n Sassy Stamps graphic below. This will take you to the web site using my affiliate link. By using my link I will receive a small commission at no additional cost to you. This commission will help to maintain my blog so I can continue to bring you crafty inspiration.
Thank you for visiting! If you like seeing fun projects, then please subscribe to this blog so you can receive all the fun stuff right in your email!